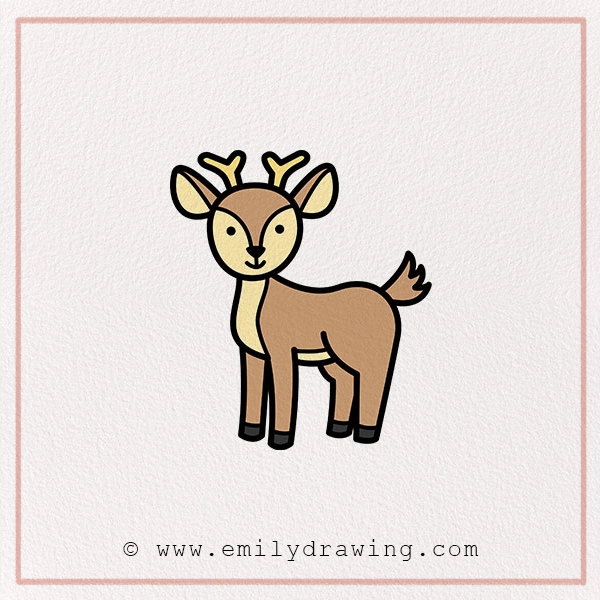
Drawing is a fantastic way to express creativity! Today, we’ll learn how to draw a cute deer in just a few simple steps. Deer are gentle and beautiful animals, often seen in forests. Did you know that some deer can jump as high as 10 feet? That’s amazing! Now, grab your pencil and let’s get started.
Why Drawing is Fun and Important
Drawing helps improve focus, patience, and hand-eye coordination. It allows kids to be creative and express their thoughts through art. Whether you’re drawing for fun or learning new skills, every stroke brings your ideas to life. Plus, learning to draw animals like deer can help kids understand nature better. So, let’s make this a fun adventure!
Materials:
- a piece of paper
- a pencil for the guiding lines and sketching
- an eraser
- a black sharpie or a pen for the outlines
- markers or colored pencils for coloring
- our printable drawing guide (Join my Email List below to get this Tutorial)
Here are my RECOMMENDED Art Supplies!
- Crayola Coloring Set (140 Pieces – Mega Value!)
- 24 Colored Crayon Set
- A4 Printer Paper
- Crayola Coloring Pencils
- HP Home Printer with Instant Ink!
Time needed:
15 minutes.
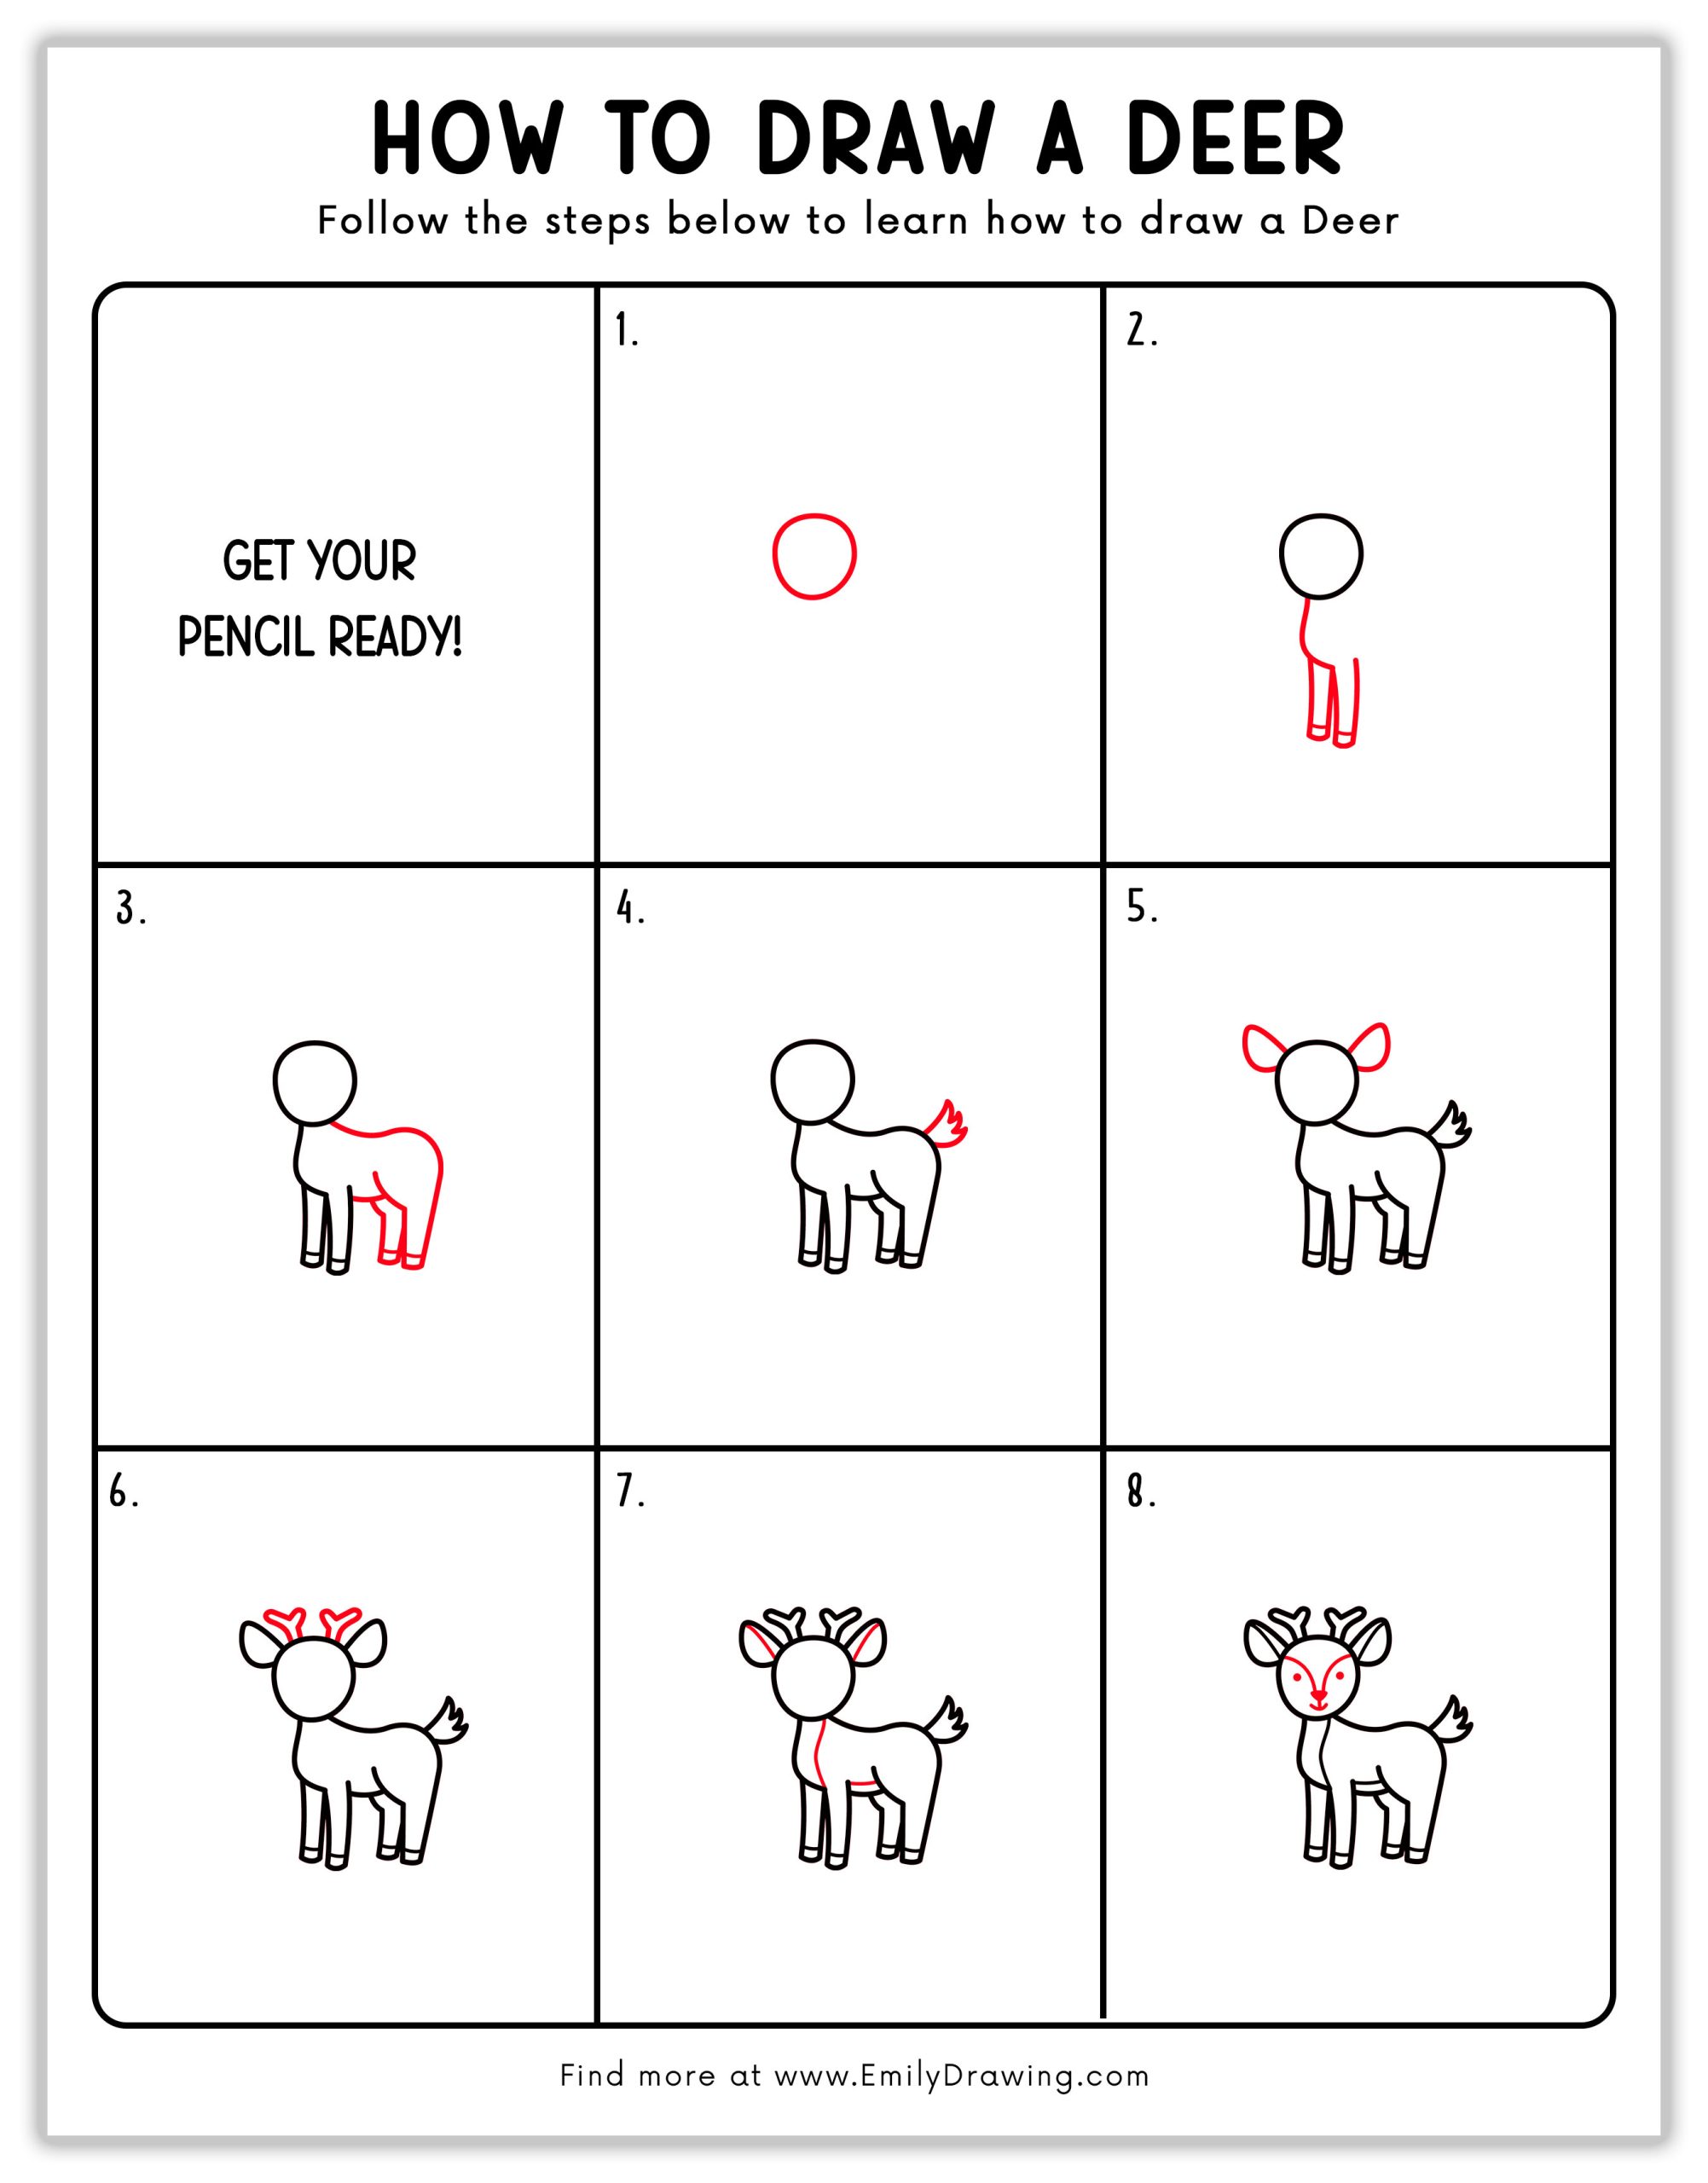
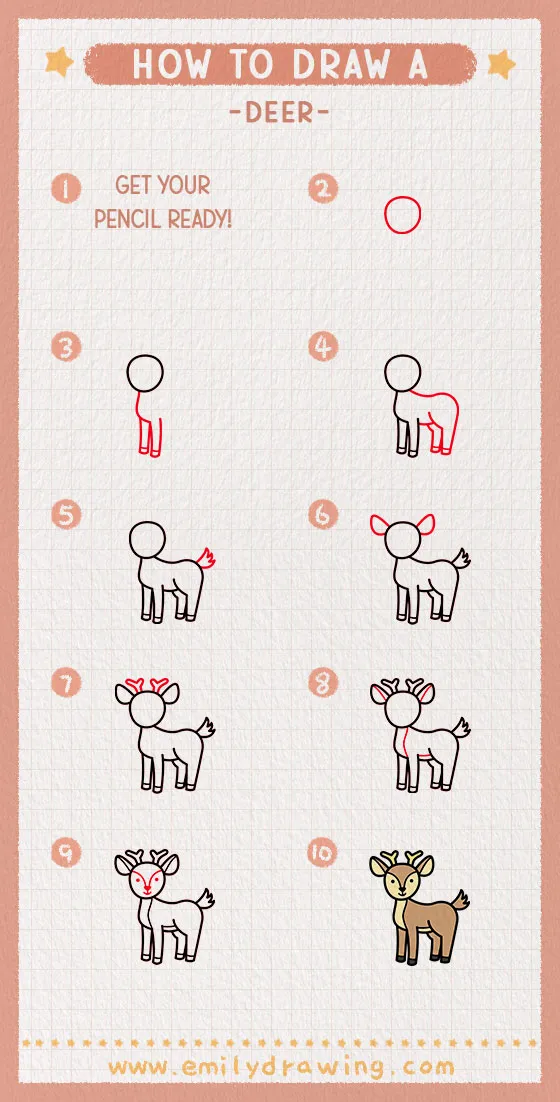
How to Draw a Deer — Let’s get started!
Step 1 – Draw the Head
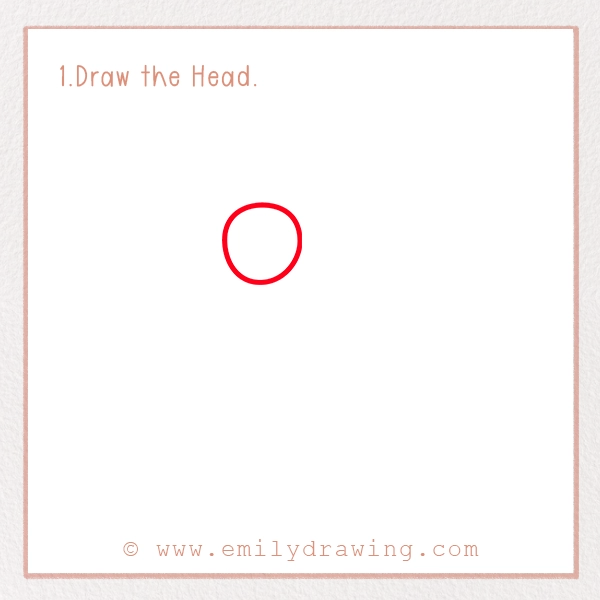
Start by drawing a simple circle in the middle of your paper. This will be the deer’s head. Make sure to leave space around it for the body and antlers. Use a light pencil stroke so you can adjust if needed. If you struggle to draw a perfect circle, use a small round object like a bottle cap to trace it.
Step 2 – Add the Neck and Front Legs
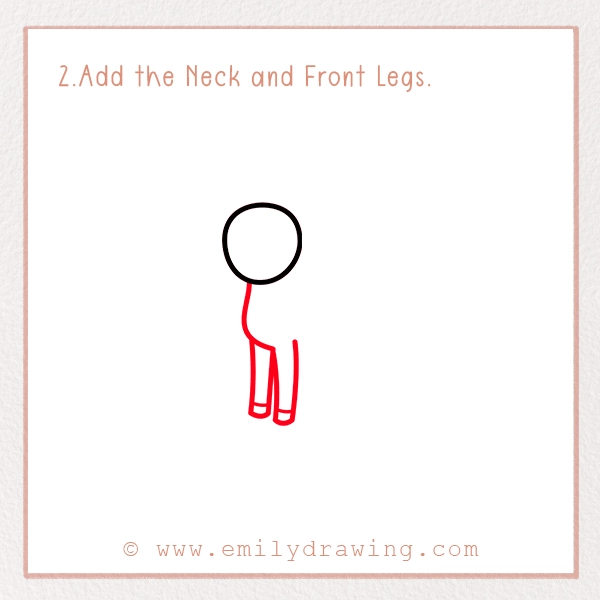
From the bottom of the circle, draw two curved lines going downward to form the neck. Then, draw two straight vertical lines for the front legs. Add small horizontal lines at the bottom to make the hooves. Hooves help deer move quickly through forests and meadows. If you want your deer to look more animated, slightly curve the legs for a dynamic effect.
Step 3 – Sketch the Body and Back Legs
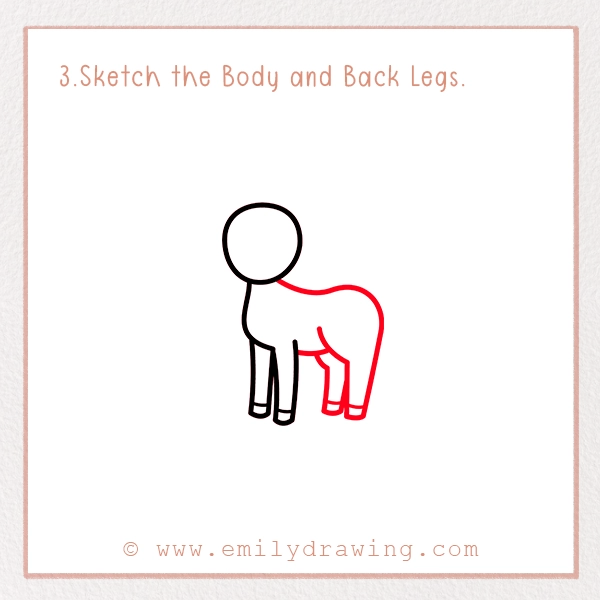
Now, draw a curved line from the neck to shape the back. Extend this line downward to create the back legs, similar to how you drew the front legs. Make sure the legs look balanced to give your deer a natural stance. A slightly arched back makes the deer look more elegant.
Step 4 – Add the Tail
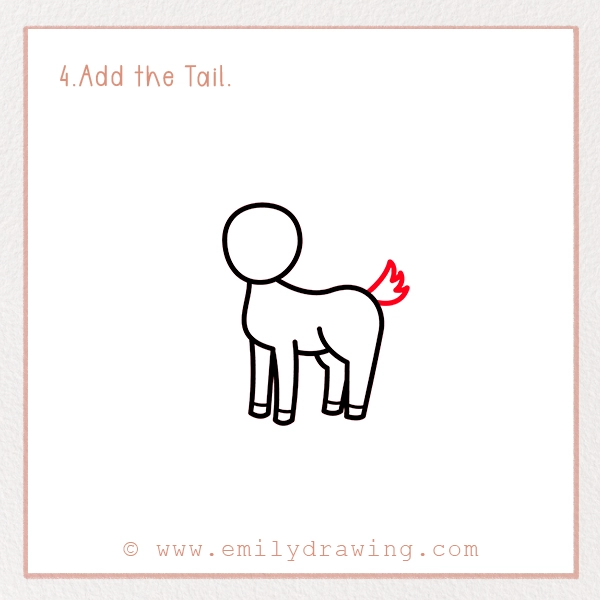
Draw a small fluffy tail at the back of your deer. Keep it slightly curved to give it a natural look. Deer use their tails to signal danger to others. If you want, you can add a few fur details to make it look fluffier. The tail adds personality, so experiment with different styles!
Step 5 – Draw the Ears
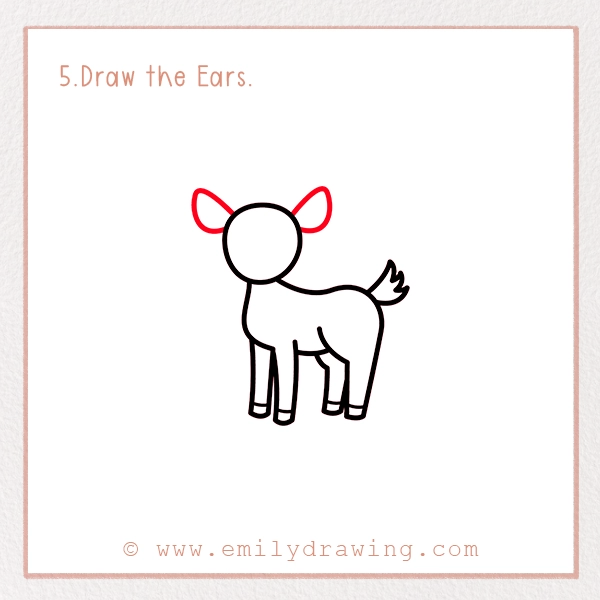
Time to add the ears! Draw two small oval shapes on each side of the head. Deer have large, pointed ears that help them hear even the tiniest sounds. They can move their ears in different directions to detect predators quickly. Make sure your deer’s ears are slightly tilted for a more alert and curious look.
Step 6 – Add the Antlers
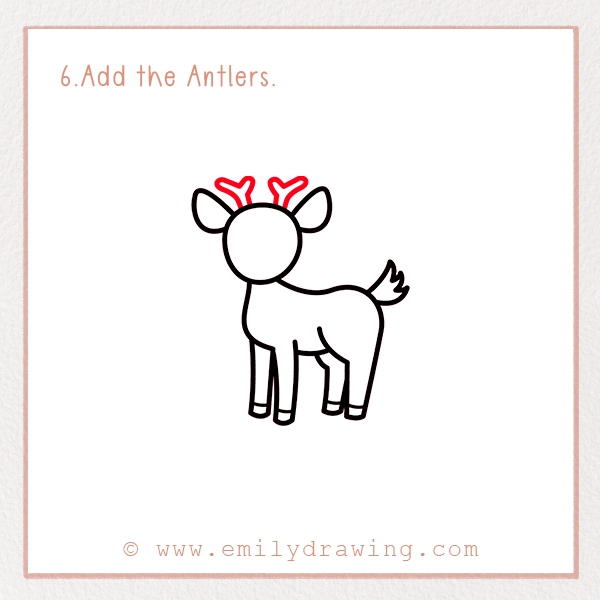
Deer antlers are unique! On top of the head, draw two branched shapes to make the antlers. These will give your deer a majestic look. Fun fact: only male deer, called bucks, grow antlers. They shed them every year and grow new ones!
If drawing antlers seems tricky, start with two simple lines branching upwards, then add smaller branches extending from them. You can make them as big or small as you like!
Step 7 – Add Details to the Neck
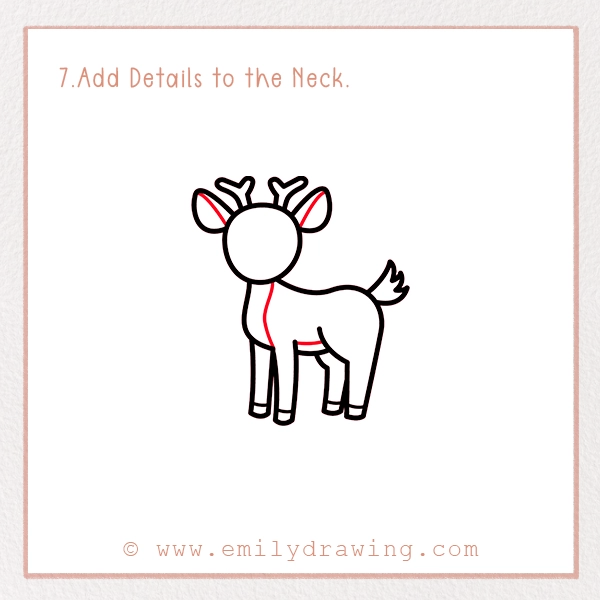
To make your deer look more realistic, draw a curved line on its neck to show its fur pattern. You can also add a few light strokes to indicate fur texture. This small detail will make your drawing stand out. Adding a fur line gives your deer a soft and natural appearance. Try using short, light strokes to create texture.
Step 8 – Draw the Face
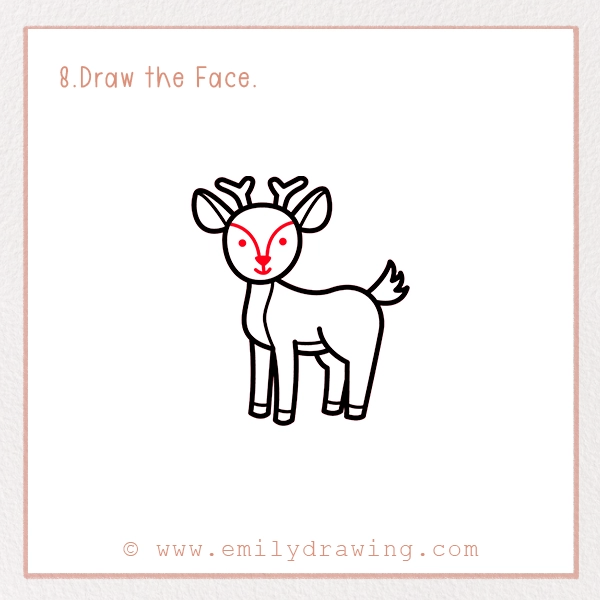
Now, give your deer a cute expression! Add two small circles for the eyes, a tiny upside-down triangle for the nose, and a gentle curve for the mouth. You can also add little dots on the cheeks to make it look extra adorable.
Want to give your deer more personality? Try different eye shapes! Large, round eyes will make it look more cartoonish, while small eyes will make it look more realistic.
Step 9 – Color Your Drawing!
Bring your deer to life by coloring it! Most deer are brown with white spots. You can use light brown for the body, dark brown for the hooves, and black for the eyes. Be creative and have fun! Add some grass and trees in the background to make it more lively.
For a fun twist, try using different colors! Maybe your deer is a magical forest creature with blue or pink fur. Let your imagination run wild!
Pin it now, Draw later!
Fun Facts About Deer!
- Deer have been around for over 10 thousand years!
- Male deer, called bucks, grow new antlers every year.
- A baby deer is called a fawn and can stand just minutes after being born!
- Some deer species, like the reindeer, are the only ones where both males and females grow antlers.
- Deer can run up to 30 miles per hour to escape predators!
- They are excellent swimmers and can cross rivers easily.
- Deer’s eyes are on the sides of their heads, giving them a wide field of vision.
- They communicate using body language, sounds, and even scents!
Tips and Tricks for Better Drawing
- Use light pencil strokes so you can erase mistakes easily.
- Start with basic shapes like circles and ovals before adding details.
- Make sure your proportions are correct—if the legs look too short or long, adjust them.
- Add shading to give your deer a more realistic look. Darken some areas slightly for depth.
- Practice drawing different poses. You can try making your deer stand, jump, or look backward.
- Try different art tools. Use colored pencils, markers, or even watercolors to experiment with textures.
- Use reference images. If you’re stuck, look at real deer pictures to help with details.
- Experiment with expressions! Try different eye shapes and mouth curves to change your deer’s mood.
- Keep practicing! The more you draw, the better you’ll get. Every great artist started with simple sketches!
Great job! You’ve just learned how to draw a deer. Keep practicing, and soon, you’ll be able to draw a whole forest of animals. Drawing takes time and patience, so don’t worry if your first attempt isn’t perfect. Every artist improves with practice!
We hope you enjoyed this tutorial! Share your drawings with friends and family. If you loved this guide, try drawing other animals too. We’d love to see your artwork, you can post it online using #EmilyDrawing!
Remember, the key to becoming a great artist is to have fun and keep practicing. Grab your sketchbook and start creating your own amazing animal drawings.
Happy drawing!
Get the FREE Printable Drawing Guide