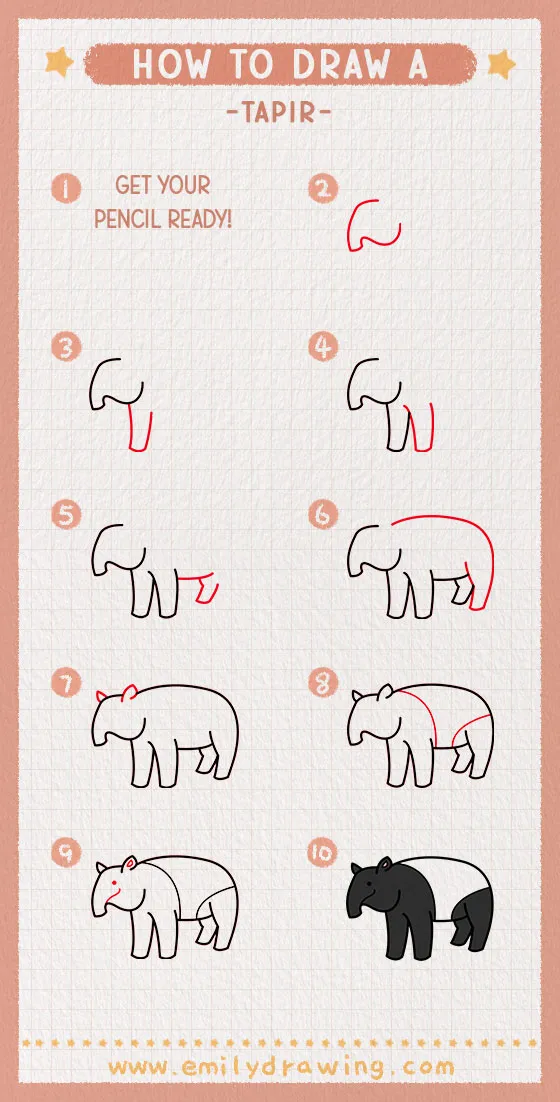
How to draw a Tapir? I know a lot of kids want to learn the drawing of this cute mammal. So, I have arranged this 8-step easy guide for all those who desire to become an expert artist.
This drawing tutorial will revolve around simple shapes and lines that kids can draw. Before starting this guide, make sure you have all the art supplies and different reference pictures.
Key Facts of Tapir Animal
- Tapir are the most primitive mammals on Earth, not changing a bit in the past 20 million years.
- Their babies are the most adorable calves you will ever see. They take cute to a new level, looking like a perfect mix of a piglet and a fawn.
- They are herbivores, so their diet typically revolves around plants, fruits, berries, and foliage.
- They can live up to 30 years.
- These mammals communicate with each other by whistling.
- They are mostly nocturnal, sleeping all day long and waking in the afternoon to eat.
- They are great swimmers.
Easy Step-by-Step Guide to How to Draw a Tapir
Before starting this guide, make sure you have all the art supplies and different reference pictures. This will make your drawing journey smooth and fun.

Materials:
- a piece of paper
- a pencil for the guiding lines and sketching
- an eraser
- a black sharpie or a pen for the outlines
- markers or colored pencils for coloring
- our printable drawing guide (Join my Email List below to get this Tutorial)
Here are my RECOMMENDED Art Supplies!
- Crayola Coloring Set (140 Pieces – Mega Value!)
- 24 Colored Crayon Set
- A4 Printer Paper
- Crayola Coloring Pencils
- HP Home Printer with Instant Ink!
Time needed:
15 minutes.
How to Draw a Tapir — Let’s get started!
Step 1 – Sketch the Snout

Tapirs are famous for their soft and flexible snouts- the combination of the nose and upper lips. They use their unique nose in various ways such as grabbing the food and plants that are out of their reach. Moreover, they use it as snorkels when they are underwater.
To draw this, you should start with the outline of the head. Sketch a small curve shape that goes downward in the form of a bulge.
Create this bulge shape in the front and sketch a curved line going in the backward direction. It should give a shape to this animal’s head.
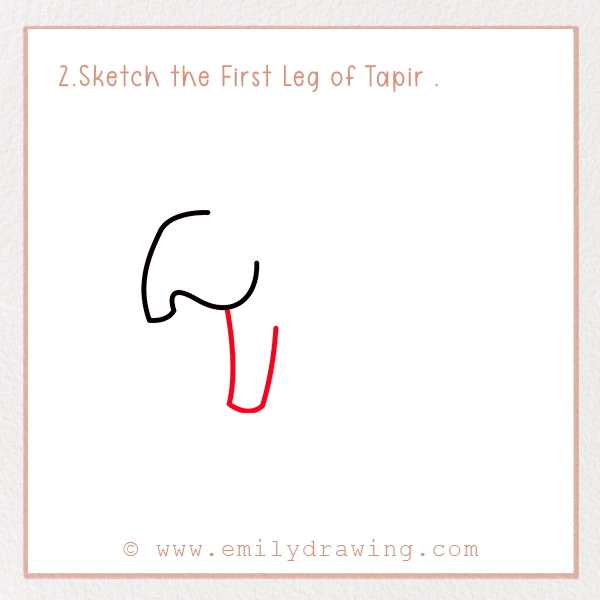
Step 2 – Sketch the First Leg of Tapir

Like every other mammal, a tapir has four legs. But, we are going to focus on the first one in this step.
To do this, you should sketch a vertical line from the center point of Tapir’s head. Make sure this line is slightly tilted.
At the bottom, create a rounded shape, followed by a line tilting in the outward direction.
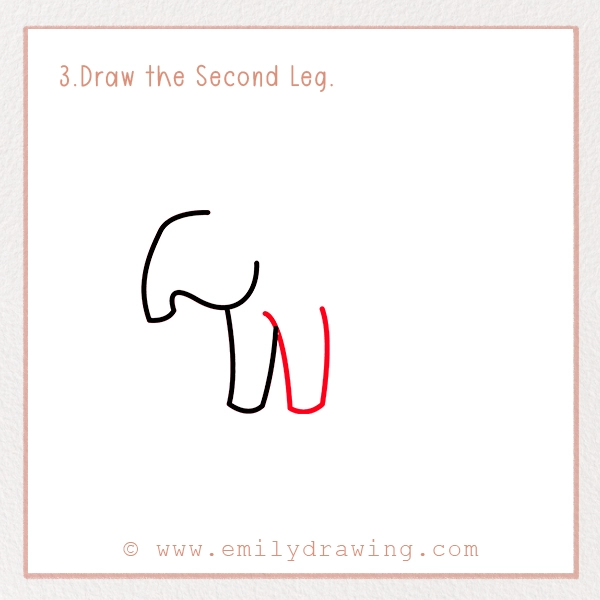
Step 3 – Draw the Second Leg

For drawing the second leg, you have to follow the same procedure as the first one. Put your pencil on the back line of the front leg. From there, draw a tilted vertical line. Create a rounded bottom that should proceed with a straight vertical line facing the upward direction.
Here, you should make sure these legs are evenly spaced.
Step 4 – Sketch the Belly and the Back Leg

In this how-to draw a realistic tapir, we have to sketch the belly and the back leg. The body of the Tapir should be rounded as it is famous for its heavy body.
From the back of the front leg, sketch a curved line to indicate the belly. Extend it as much as you want the body of the animal.
Remember: A tapir has a rounded body, so don’t sketch an elongated belly here.
On the outline of the belly, draw a few curved vertical and horizontal lines. Give them the shape of the hind leg as shown in our reference picture.
This leg is on the other side of the body, so make sure to keep it the smallest among the four.
Step 5 – Sketch the Hind Leg and the Body

At the end of the belly, starting from inside the body, sketch a small curve shape, followed by a vertical line, facing the front leg. End it with a rounded bottom to depict the hooves of this mammal. Extend the hooves with a straight tilted vertical line.
Your last hind leg is drawn. Now, it is time to create the body.
For drawing it, put your pencil near the front of the head, just an inch away from it. Sketch a curved shape, connecting with the last hind leg.
Step 6 – Create the Ears

The space we left between the body and the head is for the ears. Draw a small, rounded, triangular shape in between it for depicting the front ear.
The other ear is on the back side of the body, so sketch another triangular shape parallel to the first one.
Step 7 – Add the Color Divisions on the Tapir’s Body

Tapirs have a characteristic two-tone body, so we need to add some body details to divide the color division.
For this, sketch two curved lines. The one line should separate the front body part from the backward. Then, draw the second curved line, separating the hind legs.
Make sure these curved lines follow the natural body shape.
Step 8 – Add the Facial Details

This is the last step where we will focus on sketching the friendly face of our Tapir. We will add details to the ears, sketch an eye, and a smile on the face of this mammal.
First of all, draw a small triangle in the front ear to give some depth to it. Then, create a thin curved line inside the head, starting from the snout. This line will depict the smile of this animal.
Finally, draw a small dark circle on the upper portion of the head. You can add a white dot in the circle, too, to give a cute look to your drawing.
The basic outline of your realistic tapir drawing is now complete. Now, it is time to make it professional and lively.
Step 9 – Coloring Your Realistic Tapir Drawing

You may remember I told you Tapir’s body is double-toned. So, follow this tapir coloring guide and grab two shades to make your animal drawing realistic.
Our drawing reflects the Asian Tapirs as they have black and white bodies. Except for them, there are American Tapirs who are brown. They have a dark brown shade in the front and on the back legs and a lighter shade in the center.
Background Tips of Tapir Animal’s Drawing
Tapirs are shy animals that prefer deep forests and rivers. So, you can sketch greenery and the river in the background to give your drawing a realistic look.
Moreover, they use their nose to grab fruits. You can find any picture of it on the internet and can draw this pose.
If you don’t want to do this, depicting a family of Tapir can be a good idea—similar to techniques shown in our tutorial on drawing an orangutan. You can follow this drawing guide for sketching numerous adult Tapirs.
Pin it now, Draw later!

Conclusion
Finally, your Tapir drawing is complete. I hope you have enjoyed the process of sketching it even if you failed to achieve the perfect drawing in the end.
If you think your Tapir drawing is not good, you should keep practicing. Ask for feedback from the people around you to figure out your mistakes.
Once you have mastered this drawing, check out our other animal drawing tutorials, such as how to draw a deer, to become an expert artist.


